
LED lighting is very popular, and due to the ease of installation of LED strips, even people who are not very versed in such work can install it. You only need basic school knowledge of physics and following step-by-step instructions.
- General rules for connecting LED strip
- The sequence of simple connection of the LED strip
- Tape Length Calculation
- Tape cutting
- Connecting to a 220 V network, connecting a power supply, a dimmer
- Scheme from one power supply and one tape
- Scheme of one power supply and two tapes (taking into account the appropriate power of the power supply for such a load)
- Connecting tape pieces
- Complex wiring diagrams
- Connecting multiple tapes
- Connecting an RGB tape
- Connecting to a computer power supply
- Possible connection errors and their elimination
- Errors when connecting a long tape
- Mounting the tape without a profile
- Wrong choice of power supply
General rules for connecting LED strip
When installing LED strips, you must adhere to the following rules:
- The product should not be subjected to any mechanical stress (it must not be bent, wrinkled), otherwise there will be problems associated with the contacts, and at best only individual parts will shine on the tape.
- In the process of connecting tape pieces, it is necessary to avoid damage to the conductive tracks on the board. Otherwise, the same damage will occur.
- If the current load of the tape piece exceeds 4A, manufacturers do not recommend using connectors to connect and connect LED strips. It will be safer to use soldering.
- The power supply must be selected according to the full load of the LED device, and the PSU power must be 30% higher. If the power of the unit is lower, then in a year of operation it will become faulty, like the tape, and the money savings will not be justified.
- An RGB controller or dimmer to change color or brightness and obtain dynamic effects must be no less powerful than the connected tape. In this case, there is no need for a power reserve. If the RGB controller or dimmer has insufficient power, then an additional signal amplifier will be required to make up for the missing power and the required number of channels (for a single-color tape – one channel, for an RGB tape – three, for a RGBW tape – four).
- If a metal or other conductive surface is used to fix the LED strip, then it is necessary to install electrical insulating material between the strip and the support so that no current flows.
- Dust and moisture protection must be performed in accordance with the conditions of use of the tape device.
- There is a possibility of damage to the tape by static electricity.
- When powering up the tape drive, it is safer and more reliable to contact a professional. If this is not possible, then you can do the connection yourself. It is extremely important not to confuse the input (220V) and output (12/24V) locations. In order not to get an electric shock, you do not need to work under voltage.
The sequence of simple connection of the LED strip
The easiest and fastest way to connect the wires to the contact pads of the LED strip is a mechanical connection using a special LED connector. To connect, it is necessary to match the contact pads of the tape with the contacts of the connector and snap the cover. This method is expensive because one connector costs about 0.5 m of tape and is not as reliable as soldering. Not everyone will agree to such monetary costs, given that the lighting device consists of many tape segments, and not one.
Tape Length Calculation
First, the calculation of the main length of the section on which the tape device will be fixed is performed. Be sure to take into account that the cutting of the tape can be carried out at certain intervals in accordance with the number of LEDs.
Tape cutting
The product is made up of segments connected in parallel. As part of one segment of the tape with a supply voltage of 12V, there are three cases with diodes and three resistances. Each housing contains three semiconductor crystals with red, green and blue glow. For crystals with one color, sequential switching is performed. To limit the strength of the current passing through the chains of diodes, resistances are in sequential order: R1, R2, R3. There are times when you need to connect only a small piece of tape, and not all 5 meters of the product, which is in a standard reel. Then it must be cut in pre-marked places.
The LED strip can be cut with ordinary clerical scissors. As a rule, the marked segments are equal to three LEDs. This is due to their serial parallelization of 3 copies.
If the tape is cut along the lines of the manufacturer, then this will not lead to negative consequences. But only two LEDs with an open circuit will not shine.
Connecting to a 220 V network, connecting a power supply, a dimmer
After choosing a power source, you need to connect an LED strip to it.
Scheme from one power supply and one tape
Connecting wires are connected to the outer end of the tape. If they don’t exist, you’ll have to solder them. The red wire (-+) and black (–) are measured so long that it is enough to the power supply. They are cleaned from both sides. Using a low-power soldering iron, solder the wires to the tape tracks. This must be done as quickly as possible so as not to harm the LEDs, not to overheat them. In areas where soldering was performed, high-quality insulation should be made using heat shrink tubing. Then the tape is connected to the power supply. Watch the video of simple LED strip installation: https://www.youtube.com/watch?v=EmdDpr5sJH8
Scheme of one power supply and two tapes (taking into account the appropriate power of the power supply for such a load)
If you need to install, for example, an eight-meter LED strip, you will have to connect two segments of 3 or 5 meters each. In this situation, the location of the incision line is determined. Then, with the help of wires, a broken circuit is soldered. After soldering, the two pieces can only be connected using a parallel connection, not a series connection. In certain situations, one power supply unit is connected to several LED strips located at different distances (for example, shop window lighting in stores or lighting other objects at different distances). In this case, there is no need to lay wires for each section. You can replace everything with one main highway, to which the required number of LED strips is already connected. The dimmer for the LED strip is powered by 12/24V. It is connected in a circuit with a power supply, and on the other hand, an LED strip is connected to it. The output of the power supply is connected to the input of the dimmer, and its output is connected to the LED strip. Be sure to observe the polarity.
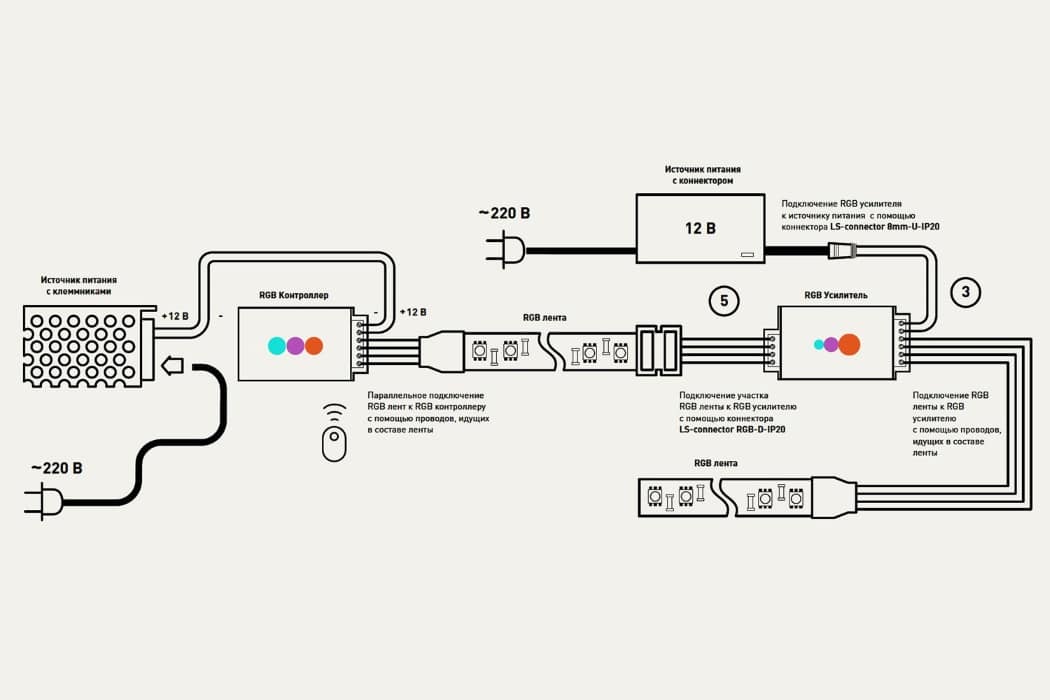
If the dimmer does not have enough power to connect the tape, then you need to use an amplifier (the connection diagram is shown at the beginning of the article).
Connecting tape pieces
Soldering is used to connect segments of tape segments. It is necessary to clean the surface of the contact pads located in the region of the cut lines. Each platform on the end section of the tape is connected to the platform from the other end. In this case, a wire is used, the diameter of which is not more than 0.5 mm. To gain access to the contact pads, it is necessary to remove the layer of silicone coating of the tape (only sealed products have it). Then the wires are soldered to these sites. There are options for connecting LED strips using connectors. To do this, their contacts are connected to each other, and the cover is snapped on top.
Complex wiring diagrams
Connecting multiple tapes
If several tapes are connected, and the power supply does not provide enough power, then each of them can be used with its own unit if it has the necessary parameters.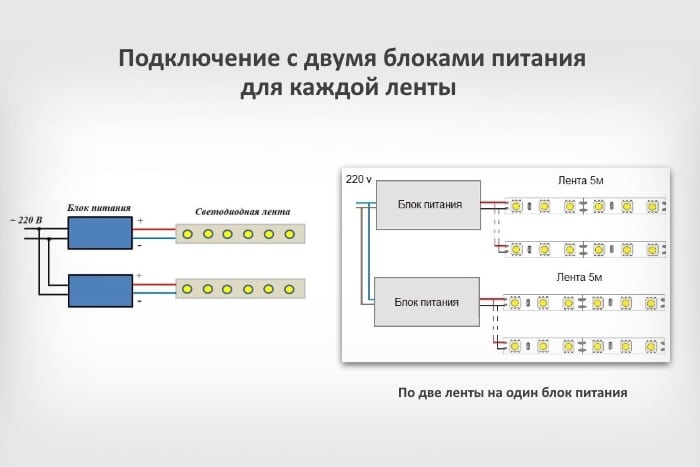
Connecting an RGB tape
When
connecting an RGB LED strip , an additional device is used – a controller. With its help, colors are controlled, the intensity of the illumination of the diodes depends on it. The difference from single-color tapes is that four wires are used for connection: one of them is common, and colors are controlled using the other three wires. When connecting, soldering or special connectors are used.
Connecting to a computer power supply
The PC power supply has a 12V power rail that is suitable for LED modules. In the presence of an ATX block, the device cannot be started immediately by plugging it into a power outlet. To do this, you must first close the green and black wires on the main connector.
The computer power supply is not recommended for use without load.
Possible connection errors and their elimination
The main causes of LED failure include the use of low-quality products and power supplies, as well as improper installation and connection of the tape. Due to errors, the life of lighting devices is significantly reduced.
Errors when connecting a long tape
When making a decorative connection, the lighting strip can be 10 or even 25 meters long. At first glance, it seems that you can connect it in sequential order and you’re done. However, these are wrong actions. A single piece of tape can be a maximum of 5 meters long, because it has been previously calculated that a certain amount of current can flow along its tracks. When connecting another five-meter segment of the LED strip, there is a significant increase in the calculated load on the conductive tracks in the first piece. Such a connection leads to an uneven glow of the LEDs and will cause a quick burnout. To illuminate sections whose length exceeds 5 meters, the tape pieces are connected in parallel, for this you will have to use a long connecting wire (5 m or more).
The main thing to consider is the high resistance of a long wire. In this regard, so that the voltage does not drop so noticeably in it, this additional wire must be double-sectioned.
LED strips are connected with one or two power supplies using a one-sided or two-sided connection. In addition, with double-sided installation, the power of the product must necessarily exceed 9.6 W / m. Such lighting will be more expensive, because an additional cable will be required, but this is compensated by the quality and longer service life.
Mounting the tape without a profile
The LED strip must be fixed to an aluminum profile that acts as a cooling radiator. During operation, not only a stream of light comes from the diodes, but also heat, and if overheating occurs, their light output will decrease, because the LEDs will degrade and collapse. As a result, it turns out that instead of 5 years of tape service, it will fail within a year. However, if an aluminum profile is present, the LEDs will function at normal temperature conditions. How to select and install a profile is described
here .
Overheating is most likely for LED strips with a silicone protective film on the diodes. Heat transfer on such tapes occurs only through the substrate, and when it is glued to a wooden or plastic surface, rapid overheating is ensured for such tapes.
Wrong choice of power supply
It is important to remember that the power of the power supply must be 30% higher than the total power of the LED strip connected with it. Thanks to this power reserve, the device will be able to work reliably and for a long time. When installing a power supply with approximately equal power parameters, it will operate at its limit, which will lead to a reduction in its resource. It is not difficult to calculate the required power of the power supply. For example, when buying a 15-meter tape, if its power is 4.8 W per 1 meter, the size of the total power will be 4.8×15 + 72 V. This will require a power supply with a power reserve of 30%, resulting in 93.6 Watt. How to calculate the required power of the power supply is described in detail in the video below: https://youtu.be/WA07cYPxYD0?t=93 Having independently studied the features of connecting LED strips, you can provide any work or home space with efficient and economical lighting. The main thing is to follow the simple rules for working with electricity and the calculations made.


У меня светодиодные ленты вмонтированы в кухонные шкафчики, для подсветки столешниц. Очень удобная и экономная такая подсветка. Но, регулярно и систематически светодиодные ленты выходят из строя. Только поле прочтения этой статьи, мне кажется, что я установил причину проблемы. Все без исключений ленты вмонтированы в пластиковый профиль, и именно через это они перегреваются. Теперь обязательно куплю и переустановлю профиля. Рад, что нашел здесь эту статью, с такой качественной и легкой к восприятию информацией. Теперь самостоятельно смогу подключать светодиодные ленты, учитывая эти советы и рекомендации.
Мы с мужем планируем сделать потолок в детской спальне из гипсокартона и пустить по краю светодиодную ленту. Вот если бы я сейчас не прочитала эту информацию, мы точно наделали бы кучу ошибок. Теперь я знаю, что нам понадобится алюминиевый профиль для основы крепежа, ну и не цельную ленту будем крепить, а кусками по пять метров. Благодарю за полезные советы.
2 дня не мог подключить светодиодные ленты в машину, не мог понять в чём проблема. Благодаря вашей статье смог выявить проблему, спасибо.
В комнате самостоятельно крепили светлодиодную ленту, и почти сразу она стала гореть раз через раз, (да и когда горит то абсолдютно не так как надо(((. И благодаря вашей статье, наконец то поняла где ми наделали ошибок (не поставили усилитель, не закрепили на алюминие(возможно от етого лента перегревается) да и немного промахнулись с мощностью блока питания). Теперь все ошибки учтени, (будем попробовать все переделать), или в крайнем случае, купим новую ленту и все сделаем по вашим рекомендациям.
Спасибо за статью и информацию , благодаря ей мы разобрались как выбрать и подключить светодиодную ленту для подсветки потолка из гипсокартона в квартире. Добились очень привлекательного эффекта. На основное освещение моя подсветка не тянет, но как декоративная или ночная – смотрится очень хорошо. Работает уже довольно долго, да и электричества потребляет немного. Мы довольны.