There is little natural light in garages, and windows are either small or non-existent. Powerful lamps are needed here – efficient and safe, allowing car mechanic or other work to be carried out in conditions of light comfort. Better than others, led-lamps cope with the tasks.
- Requirements for garage lighting
- Pros of led garage lights
- Varieties of led-lamps
- Ceiling
- wall
- How to choose LED lamps?
- Proper organization of LED lighting
- Calculation of the required amount of light
- How to arrange lamps: lighting schemes
- Pit Lighting Tips
- Autonomous lighting options
- Do-it-yourself installation of LED lighting in the garage
- What will be needed?
- Basic work step by step
- Installation of lighting in the pit
- Installation and installation of the electrical panel
- Useful tips from an electrician
Requirements for garage lighting
Garage lighting should create optimal conditions for car storage and maintenance. To achieve this, it is important at the planning stage to consider the wiring diagram, the location of the lamps, their number and characteristics.
When deciding where and how to place electrical appliances, you should be guided by the rules for locating lighting fixtures in garage rooms:
- Lighting should be uniform. To implement this requirement, it is necessary to combine the main light sources with lamps of local significance.
- The lamps used must be energy efficient. Since there is almost no natural light in the garage.
- Use modular luminaire layouts. Thanks to them, it is possible to combine the main and local lighting.
In addition to the general rules for organizing lighting, there are separate requirements for lighting fixtures. For 1 sq. m garage should account for at least 15 watts of power.
Lamps in the garage are placed at such a height that the light from them qualitatively illuminates the work area. Lamps should not be allowed to illuminate the space only above the line of the eyes.
Pros of led garage lights
Most often, garages do not have windows, so you have to rely only on artificial lighting. Since he will have to work a lot or even constantly, it is advisable to use the most economical lamps – LED.
Benefits of led garage lights:
- High resistance to mechanical damage.
- Correct operation in conditions of sudden temperature changes.
- Large working resource – led lamps can work for over 10 years (about 50-100 thousand hours).
- Allow repeated switching on and off without compromising the duration of operation.
- They do not heat up during operation – this is an extremely important quality for a garage, since overheating of lighting devices is one of the causes of spontaneous combustion (the presence of flammable liquids increases the risks – antifreeze, oil, etc., they can catch fire even from a hot light bulb).
- Easy installation – LED-lamps can be installed independently.
- Excellent luminous flux characteristics – LED lamps create a bright light that is as close as possible to natural light, it does not cause discomfort to the eyes during an arbitrarily long stay in the garage.
- Environmental friendliness – there are no toxic components in the composition of led lamps (unlike fluorescent lamps containing mercury).
- Profitability – today LED lamps are leaders in energy saving, their use allows you to save up to 80% of electricity.
- LED lamps are available with different bases, so they can be matched to any type of lamp.
The luminous efficiency of led lamps is 120 lm/W. LEDs can differ in the emitted light – it can be warm, cold, neutral.
Despite all the advantages, LED lamps have a drawback that is characteristic of all devices powered by the network – when the power supply is cut off, they go out. In this case, car owners keep a lantern for the garage – a lamp that runs on batteries or from a battery.
Varieties of led-lamps
Lamps are chosen not only taking into account technical parameters, but also their design, installation method. In the garage, linear led-lamps are usually mounted, they are the ones that give a strong and uniform light better than others. You can mount them on the ceiling or on the walls.
Widely used in retail and office spaces, Armstrong ceilings can also be used in garages. Their convenience lies in the ease of dismantling and access to communications. If the ceilings in the garage are made of cells, you will need to purchase special led-lamps.
Ceiling
Ceiling-mounted LED lights are ideal for general garage lighting. Linear designs are leading, giving a large angle of flow opening.
Ceiling lamps, for example, track lights, are especially often used in the garage. They are used if the ceiling height does not exceed 3 m. Such lighting devices are placed in places of increased visual load, for example, above the hood of a car. Other lamps are mounted evenly throughout the ceiling.
LED ceiling lights for the garage can be rectangular, round, square. In large garages, it is recommended to install rectangular lamps up to 0.8 m long. The lamps are carefully fixed to the ceiling so that they do not fall off under their own weight.
wall
Wall-mounted luminaires are installed slightly above eye level. Most often, at a height of 1.8 m from the floor. Wall options can be both linear and point. They are concentrated in the working areas or evenly distributed around the perimeter.
Wall lamps are located quite close to the organs of vision, so they do not require much power. Such lamps are mounted on special brackets – they are usually provided for by the design of the product.
When deciding which lighting in the garage is better to choose – wall or ceiling, consider the height of the ceilings, as well as the volume and nature of the work performed. For local lighting, choose wall-mounted versions or portable LED spotlights.
How to choose LED lamps?
To create optimal lighting in the garage, you need to choose the right led-lamps. You can not buy the first ones that come across – their characteristics may not correspond to the operating conditions. You should not choose the most budget options – there is a high risk that they will fail after a couple of months of work.
Criteria for choosing led-lamps:
- Waterproof class. Not less than IP 54.
- Protection against mechanical damage. High.
- Design. There are two types of LED garage lights – lamp and linear . The former differ from each other in the type of base, power, color temperature, etc. Linear analogues or tapes are a flexible board covered with LEDs.
Led strips operate on direct current with a voltage of 12/24 V. To equip the lighting in the garage at 12 volts (or 24 V), you will need to purchase a special converter. Its power is calculated taking into account the power of Led tapes. - Manufacturer. It is advisable to buy products of well-known brands. It is better not to take Chinese cheap analogues.
- Price. The price range for LED products is very wide. Budget lamps and their analogues from expensive brands may differ in price by an order of magnitude. It is recommended to choose the “golden mean” – lamps that have the optimal ratio in the “price-quality” formula.
Proper organization of LED lighting
When organizing lighting in the garage, a certain sequence of actions is required. First, the required number of fixtures is calculated, and then their location is determined. Preparation for installation is completed by drawing up a wiring diagram.
Calculation of the required amount of light
To calculate the number of fixtures for the garage, you can use the standard calculation method.
Calculation formula: P = (p×S)/n, where:
- P is the illumination of the room;
- p is the power of the luminous flux per 1 sq. m;
- S is the area of the room;
- n is the number of fixtures.
This method is complicated by the fact that the user does not always know such parameters as illumination and power of the luminous flux of led-lamps . It is much easier to calculate the power.
How to calculate the number of fixtures by power:
- It is assumed that for every 1 sq. m will account for 4 watts of LED lighting.
- Multiplying the area of the garage by 4 watts will give you the total wattage of the lamps.
- It remains to choose fixtures – such that in total their power is the value found above:
- for example, for high-quality garage lighting, 100 watts are required;
- if you decide to install led-lamps with a power of 10 W, you will need to buy 10 pieces.
How to arrange lamps: lighting schemes
A well-thought-out arrangement of lamps and a rational wiring diagram help to achieve uniform lighting.
Principles of placement of lighting fixtures in the garage:
- Ceiling LED lights in large garages are recommended to be installed in two rows – along the edges of the ceiling, at intervals of 1 m from each other and at a distance of 0.5 m from the walls.
- In garages with high ceilings, wall lamps are additionally installed – overhead or mortise, height from the floor – 1.5-1.8 m.
- In small garages, you can limit yourself to wall lights, abandoning ceiling models.
- Led-lamps in work areas are placed taking into account the performance of work, whether a person is standing or sitting during their performance – the lamps should be below the level of his eyes.
- Lower lighting will help prevent accidental injuries from tools lying on the floor – the lamps are placed parallel to the floor surface, at a height of up to 0.4 m (this solution will also be convenient if the garage is used only for car storage).
- Switches are located at some distance from gates, windows and jambs, the minimum distance is 15 cm
- Sockets are located at a distance of 60 cm from the floor level, no less.
An option with lower lamps, supplemented by one ceiling lamp for general lighting and one or two portable lamps, will be the most optimal.
The wiring diagram in the garage is drawn up taking into account the type of fixtures (spot / general). Mark on it:
- where a switchboard and a meter will be installed, an introductory machine, a machine for common sockets and for powering the entire system;
- places for cable laying – on the ceiling and walls;
- installation points for sockets, junction boxes, switches, step-down transformer;
- connection points for general and local lighting;
- points of connection to the equipment (if necessary).
Below are three examples of wiring diagrams:
- Wiring diagram of the garage from the viewing hole;
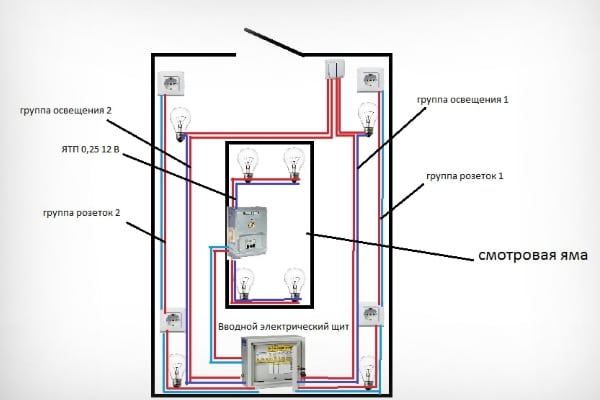
- Wiring diagram of a garage without a viewing hole;
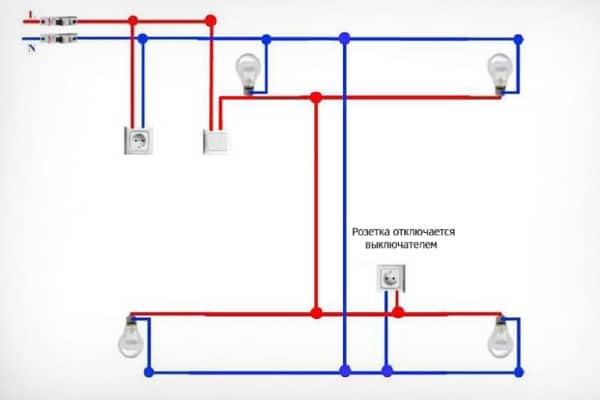
- Garage wiring diagram.

Wiring can be hidden or outdoor. Hidden mounted before applying plaster. It can also be placed in interblock slots. External wiring is laid in flexible plastic pipes or in cable channels that protect it from accidental damage, moisture and rodents.
When planning a lighting scheme, it is important to consider that the input to the switchboard must be grounded.
Pit Lighting Tips
Lighting in the viewing hole can be done independently. Here, lighting fixtures and the entire system must have additional protection against moisture penetration.
In the pits, only low-voltage lighting is equipped. To implement this solution, a step-down transformer is required. Lamps are installed so that the stream of light is directed upwards – to the bottom of the car.
Requirements for lamps for lighting in the inspection pit:
- It is more humid in the pit than in the garage itself, so lamps with an increased level of moisture protection are needed here – from IP67.
- It is quite crowded in the inspection hole, therefore, being in it, it is difficult to avoid touching the lamps, which means that the body of the latter should not heat up, this condition is ensured by the use of led lamps – they practically do not heat up.
- Lighting devices should not fail if water or dirt drips on them – from a car that has driven into the pit.
By painting the walls of the viewing hole in light shades, you can get more light. This technique is also relevant for the entire area of \u200b\u200bthe garage – choosing a lighter finish, you can install lamps of lower power.
More tips for arranging lighting in the viewing hole:
- Especially relevant here are led-lamps with IP67 protection level and 12 V voltage – safe for humans, they can be connected to each other (such lamps are ideal for economical contour lighting of the pit).
- When using a 220 V power supply, an RCD (residual current device) with a tripping current of not more than 30 mA must be installed, the lamps used must have protection from 1 to 3 (clause 6.1.14 of the PUE).
- For the most comfortable work, use a portable lamp equipped with a sufficiently long cord – it will allow you to illuminate places that are not sufficiently lit by stationary lamps as brightly as possible.
Autonomous lighting options
If power surges and power outages are not uncommon in the garage, it is advisable to stock up on autonomous lighting devices. This option will also be a good solution for owners of garages that are not connected to 220 V.
There are many solutions for organizing lighting in a garage that cannot be connected to a 220 V network, including unjustified ones:
- Solar panels. They are installed on the roof of the garage, and the lighting is powered by the energy accumulated during the day. Such a solution is absolutely not profitable because of the high cost of the project. Large funds have to be spent on solar panels, storage systems and converters.
Another disadvantage of this solution is the vulnerability of the panels to vandals and thieves. This option is justified if the garage is located in a private protected area, near a residential building in which a similar system has already been installed. Do not forget about the dependence of solar panels on the weather. - Wind generator. Unprofitable solution – you have to buy equipment that converts wind energy into electrical energy. And most importantly, there is an absolute dependence on the wind. Another minus – the windmill can become a victim of vandals / thieves.
- “Filipino” lantern. It is placed on the roof of the garage. It is a transparent plastic bottle filled with water and closed with a tin plate. Lighting here is obtained due to the refraction of sunlight.
This solution is interesting, but not for the garage. It is impractical to make holes in the roof, and in winter, when there are very few sunny days, such a lantern will be completely useless.
Among the possible options for autonomous lighting, there are two most suitable for a garage:
- Based on a car battery . To implement the project, you will need a used battery (you should not use the one that is installed in the car) and a diode tape – it is suitable for this case, as it works on a voltage of 12 V. This is how much the battery produces.
Please note that it is better not to use a dead battery, it will not provide lighting for more than 5-6 hours. - Based on a gasoline generator. It can be used in the same way as when powered by a car battery. In terms of operating time, it is inferior to auto appliances, so its use is less relevant.
- Rechargeable LED bulbs. They look like ordinary led lamps, but are equipped with a special hook – it is located near the cartridge. A light bulb charged to 100% can shine for several hours. After that, she needs to recharge.
Do-it-yourself installation of LED lighting in the garage
Having the skills to work with electrical equipment and tools, as well as observing the rules of electrical safety, you can install a garage lighting system without the involvement of specialists.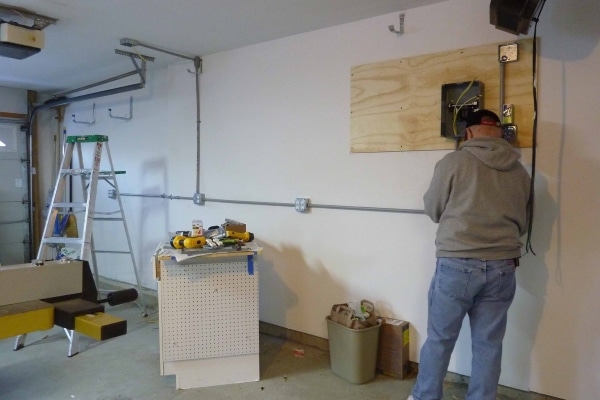
What will be needed?
For installation work on arranging garage lighting, you will need a whole set of tools and protective equipment.
What is needed to complete the work:
- perforator;
- drill;
- wall chaser;
- drills in accordance with the material of the walls;
- construction level;
- screwdriver;
- electrically insulated screwdriver;
- multimeter;
- pliers;
- wire cutters;
- construction knife;
- putty knife;
- buckets for solution;
- protective glasses;
- dielectric gloves.
Necessary materials:
- cable;
- corrugated pipe or box;
- electrical machines;
- switches;
- lamps and lamps;
- wire VVG 1.5×3 or its analogues, for single-phase lines – VVG 3×2.5, for three-phase lines – VVG 5×2.5.
The cross section of the cables is selected according to special tables, taking into account the power and rated current.
Basic work step by step
When the connection diagram is drawn up, and the tools and materials are prepared, you can proceed with the installation of the lighting system.
Work order:
- Mark on the walls the places where the lamps, junction boxes, switches, sockets will be located.
- Mark the wiring locations. Make sure that all cables run in a straight line and that the bends form a right angle.
- Get the car out of the garage. Check that all materials and tools are available.
- Make holes for all elements of the circuit with a special drill.
- Punch the walls according to the markup. Clean the holes with a perforator. If the wiring is external, the grooves can be omitted.
- Fix the corrugation / box on the walls. Thread the cable into it (at the points where the fixtures are located, bring the ends of the wires out).
- Install the input shield, connect the cables to the machines.
- Check if the input automata and RCD are connected correctly. Turn on all the machines one by one by connecting the lamp to the corresponding wires.
- Put sockets and lighting devices in their places. Check the functionality of the circuit.
Installation of lighting in the pit
Installation of electrical wiring in the inspection pit differs little from work in the garage itself. The main difference is the need to protect the wires from contact with water.
How to prevent the wiring from getting wet in the inspection hole:
- lay the wires in a corrugated plastic sleeve;
- make hidden wiring in the wall;
- seal and seal electrical contacts.
Operating procedure:
- Decide whether the wire will go to the shield through the finished cable channel, or a separate outlet will be built for it.
- Make a markup for the lamps in the pit.
- Cut out niches for lamps.
- Connect lighting devices with wires hidden in a corrugation or cable channel. Route the wire to the shield.
- Connect the transformer and switch. Check system operation.
Video about the installation of lighting in the viewing hole:
Installation and installation of the electrical panel
The electrical panel allows you to redistribute power along the laid wires and protect the system from short circuits.
Electrical installation rules:
- Install it at the entrance to the garage. If it has a viewing hole, you can put a separate electrical panel in it.
- Distribution boards – type-setting. For an ordinary garage, in which welding and metalwork work is carried out from time to time, 3 automatic machines are enough, and if there is a viewing hole – 4.
- Put the machines of the required denomination in the shield. In accordance with the calculation of loads for each consumer group.
It is recommended to put a separate machine for general lighting, one machine for sockets and a metalwork corner. Thanks to the sectioning principle, it will be possible to turn off one line – on which the damage occurred. At the same time, all other equipment in the garage will receive power.
Video about the assembly and installation of the switchboard:
Useful tips from an electrician
Work with wiring and electrical equipment requires certain knowledge and skills, strict adherence to electrical safety rules that ordinary users are not familiar with.
Before embarking on an independent installation of lighting in the garage, familiarize yourself with all the intricacies of the upcoming work and the advice of experienced electricians:
- If the lighting is divided into zones. It is advisable to install switches directly next to them – at the hood of the car, at the locksmith’s table, etc. You can also install pass-through type switches – to turn the light on and off from any position, from the entrance or in the lighting area.
- Consider emergency lighting. In case of a power outage. Use 12 V halogen or LED lamps for this purpose. If suddenly, during the repair work, the electricity fails, it will be possible to continue working by supplying battery power to the emergency lighting.
- If there is a spotlight at the entrance, connect a motion sensor to it. This will save on lighting and create additional light signaling.
- To enhance the light output. Lighting in the garage is recommended to be diffused – this can be achieved using shades and reflectors. And it is better to do portable lighting with a directed stream of light – to a certain point.
- To eliminate the risk of electrical injury. Provide a ground loop and run the 3rd wire in the wiring. This solution will also prevent the wiring from burning due to a short to the ground.
- Choosing materials and lighting equipment for the garage. Give preference to well-known brands.
Proper arrangement of lighting in the garage will not only create the most comfortable conditions for performing repair, plumbing, welding or any other work, but also ensure the electrical safety of the garage owner.

