It often happens that after a certain time of using the LED strip, it starts to blink, its light dims. You can deal with this problem on your own without the involvement of professionals. There can be several reasons for the blinking of the LED strip.
Power Supply
If the malfunction does not appear when connected, but after a few seconds or minutes, it is likely that the cause of the breakdown lies in the power supply itself. An incorrectly selected (poor-quality) device has insufficient power, which leads to a voltage drop.
When choosing a power source, it should be borne in mind that it has a power margin of at least 30%.
In a normal situation, when buying a power supply in a store, you should not rely only on the promises of a sales assistant. The tape can successfully connect and burn in normal mode, but at home, after a certain period of time, microcircuits and other elements heat up, which leads to problems. Troubles occur due to the inconsistency of many Chinese power supplies with the information specified in the passport. The plate says that their power is 200 watts, but in fact there will not be even 150 watts. When the tape with such a block is turned on at maximum power, it can “light up” and immediately go out. This is because the device is in overload protection mode. LEDs may start flashing when using inexpensive Chinese power supplies and RGB controllers after 1-2 years of normal operation. This can be explained by the fact that they contain low-quality parts and radio elements that are not able to function for a long time even at rated currents and voltages. For example, increased load with voltage drops in the network many times reduce the working life of capacitors. In order to save money, manufacturers use cheap, unreliable parts that do not provide optimal performance. Manufacturers are interested in attracting buyers by advertising the increased technical characteristics of their product, which is not confirmed in practice. In order to save money, manufacturers use cheap, unreliable parts that do not provide optimal performance. Manufacturers are interested in attracting buyers by advertising the increased technical characteristics of their product, which is not confirmed in practice. In order to save money, manufacturers use cheap, unreliable parts that do not provide optimal performance. Manufacturers are interested in attracting buyers by advertising the increased technical characteristics of their product, which is not confirmed in practice.
When buying, you should give preference to branded proven power sources, and if you purchase a Chinese version, then it is necessary that it has a double power reserve. Branded power supplies must withstand the declared technical specifications with a margin.
If there is an extended backlight equal to 15-20 meters or more, it is better to use one brand of tape during installation. Otherwise in
RGB tapemulti-colored flashing in a certain area will be accompanied by a lag effect or the passage of individual colors. The service life should also be taken into account. Prolonged trouble-free use may cause the stabilization capacitors in the units to dry out and lose their original capacity. They can become defective, which will be seen by swelling of the keg. The light from the tape will become weaker and dimmer after prolonged use. The reason for this is the natural degradation of crystals in diodes. The acceleration of this process will occur in the absence of an aluminum profile that provides normal cooling. If there is no thoughtful cooling system, degradation will occur at an accelerated pace, especially with periodic exposure to incoming ultraviolet rays.
Overheating is very likely even for expensive and high-quality products glued to a wooden or plastic base.
Similar situations are possible when connecting tapes from different power sources. Their difference in the output voltage can lead to the fact that in the section connected to the block with one Vin, the change of RGB colors will be delayed in relation to other segments. Another common reason for the flickering effect is connecting the power supply through illuminated room light switches. Since the LED lamps glow from the backlight of the switch, this is exactly what will happen with the tape. Therefore, you should connect the power source directly using the machine in the electrical panel or through the switch, but without lighting.
Some power supplies cannot be installed in enclosed spaces, such as plasterboard ceiling niches.
Poor solder quality
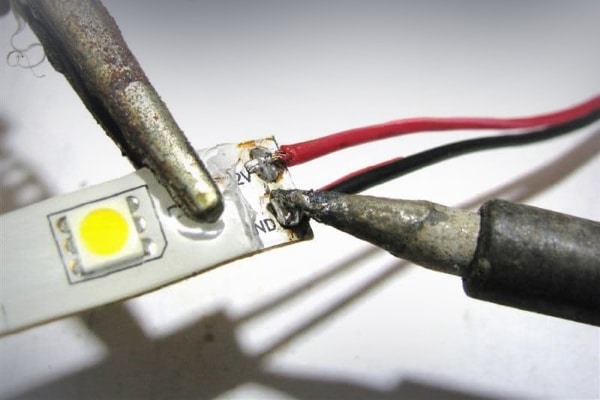
It is important to follow the rules and recommendations related to the sealing of the structure. The soldering of flexible circuit boards of the base of diodes with active (acidic) fluxes causes gradual oxidation of the pad and loss of connection. After soldering, the flux remains on the pad, which will gradually corrode the copper base.
In case of loss of contact, cut the tape and get rid of the non-working module, replacing it with a new one.
In no case should you solder the tape with a soldering iron with a power exceeding 60 watts. This can lead to overheating of the contact (when the copper pad is detached from the track, the stability of the connection will be impaired). It is not difficult to check this – you need to press the contact with your fingers and make sure that a glow appears, as well as stable operation of the board. If you remove your fingers, the light will disappear. The problem may arise if a refractory tin alloy was used, which does not provide proper adhesion to the copper pad at the chemical level. If the contact is poor, overheating and short-term voltage drops may occur, that is, the LED strip will flicker. The quality of the contacts should be checked, if necessary, solder and crimp all existing connections.
Contact oxidation on connectors
Some do not have the skills to use soldering irons, and some simply want to avoid doing this kind of work. An alternative can be considered a connection option using connectors. Their use has a significant drawback – the oxidation of the contact. Often it begins in a freshly painted room, a room with whitewashed walls, flooded with screed, high humidity. A current of no more than 10A is passed through such connectors. It is easy to calculate:
- a five-meter tape has a power of 75 W and a current of 6.5 A;
- a tape of 1 meter has a power of 30 W and a current of 12.5 A.
When the contact is oxidized, if a large current passes there, overheating and subsequent burnout occur. As a result, such contacts completely disappear.
A similar situation occurs if the contact area on the connector is insufficient. This explains the need for careful selection.
Controller and Remote
If the LED strip does not turn on at all or functions only once, the reason may lie in the dead batteries of the remote control used to control the controller with RGB technology. You need to start by checking the batteries. If the lighting device switches and changes colors independently, then the malfunction lies in the controller.
With a working remote control, such switching is unlikely to take place. To make sure that independent switching is not connected with the remote control, it is enough to remove the batteries from the case.
Another way to detect a controller malfunction is to remove the device from the electrical circuit. You need to supply power for each color separately. If there are no failures and everything is functioning properly, then the reason lies in the RGB controller, which must be replaced with a new one. If there is a flickering (extinguished) segment of three crystals on any segment of the tape, it is necessary to replace it. This can be done without even using dismantling from the profile:
- With a clerical knife, the inactive segment is carefully removed by means of a cut between the contact pads.
- It is necessary to clean and tin the copper contacts around the edges.
- The vacated area is replaced with a new segment, observing the polarity, tinning the contacts and soldering the printed conductors.
In some cases, you have to press the button several times to turn on the lighting. This suggests that the control device creates the problem. A purely functional malfunction of the remote control is possible if it is produced by Chinese manufacturers.
Fault diagnosis is possible using a tester set to the 12 V range.
Mechanical contamination of the remote control buttons or power source is possible.
Faulty LED
The above malfunctions are related to tapes operating at low voltage 12, 24, 36 V. There are also devices operating at 220 V. Lighting devices are placed in series over large areas. For example, one linear meter will contain 60 semiconductors. If one LED fails, the others will be affected. The same applies to situations where one of the LEDs starts flashing. The 12 V backlight is made up of groups of LEDs connected in parallel. Accordingly, when one of the semiconductors blinks, negative actions will fall only on a certain group.
Correcting this situation is not difficult – you need to find a faulty LED and solder another one to that area. You can use a more global way to troubleshoot – replace this module (cluster).
The appearance of a flashing effect after a certain period of time after turning on the lighting device means that one semiconductor is faulty. This happens due to the gradual heating and breaking of contact and causes further attenuation of the tape. The cooled diode will start functioning again. Such an action will be repeated with a certain cyclicity. If you have experience with electronics and the ability to use a soldering iron, replacing a defective section will not cause difficulties.
Other reasons
The blinking of the LED strip can be caused by some more reasons:
- The functioning of systems that create a diffused even glow, operating with the help of alternating voltage. From the fuse, the voltage moves to the diode bridge and from there it already comes out in the form of a constant voltage. This is necessary for an even glow.
- Violated rules for installing and connecting the tape and wiring diagram. Read more about how to properly connect the LED strip, read here .
- Non-compliance with the thermal regime. Such a case can occur when the device is placed on the board without ventilation.
- Open tape installed. Then the LEDs will lack the necessary mechanical protection.
- Non-compliance with the rules or the presence of violations during the connection of wires to the LED strip. Such cases often happen in houses where there is still old wiring.
- Reversed phases. In accordance with the norm, the switches must interrupt the phase conductor. However, if it is mixed up (lack of marking), then the switch is broken by the neutral wire, which leads to the blinking of the diode.
- Resource generation. For this reason, the flashing effect appears when the light is off, but there is a possibility of its occurrence in the working position. The latter situation leads not only to blinking, but also to a change in the characteristics of light.
If there is no mechanical protection on the LEDs, then moisture that gets on them can cause incorrect operation of the light sources.
It is unlikely that the flashing of the LED strip will lead to the replacement of the entire structure. It is better to buy a tape with a margin in length so that you can make a replacement for the problem area. It is very important to consider the quality of the purchased product. If the malfunctions that appear cause serious difficulties, it is better to contact specialists.


Даже при покупке дорогих, фирменных лент и блоков к ним, которые обещают прослужить по 50 00 часов, а это, на минуточку, 7 лет, я никогда не был до конца уверен в хотя бы половине заявленного ресурса. Обычно, 5 из 10 лент начинают мигать уже через год службы. Затем подходят и остальные. Причем за качество пайки я ручаюсь. Потом только пришел к выводу, что теплоотвод от корпуса, куда размещалась лента, был крайне низким. И из-за многократных тепловых деформаций корпуса из тонкого металла приходилось заменять проблемные участки. Опять же – хоть с дешевой лентой, хоть с дорогой. Одна и та же история. Поборол заменой корпусов крепления.
Конечно, плохо, что светодиоды соединяются последовательно. Я год назад купила светодиодную люстру с бегущим миганием, так муж замучился ее ремонтировать, периодически меняет выходящие из строя светодиоды. Хорошо, что попалась Ваша статья, я думала, что причина выхода светодиодов люстры кроется в большой нагрузке на светодиоды, но причин, оказывается много. Скажу мужу, чтобы не просто менял вышедшие из строя светодиоды, а устроил серьезную профилактику, учитывая все причины, перечисленные в статье
Отличная статья, а главное во время ее прочитала. Хотела уже выкинуть светодиодную ленту так как мы не знали, в чем же причина мигания. У нас мигал один из полупроводников, муж нашел неисправный светодиод и припаял тот участок. Все стало работать бесперебойно. C течением времени контакт стал опять отходить и мы заменили его на новый модуль. До этой ситуации лента нам прослужила около двух лет. Думаю, хороший срок. После замены модуля вообще работает на ура. Тут дело случая, у наших знакомых работает уже около четырех лет.
Спасибо вам за статью, покупала очень дорогую и фирменную ленту, но она послужила вообще не долгое время, думала уже покупать новую светодиодную ленту, а эту выкинуть, хорошо что наткнулась на статью, не понимала в чем же причина мигания. Сказала мужу как исправить, поменял вышедшие из строя светодиоды, и припаял. И все спало работать исправно. Разницы нет, дорогая или дешёвая лента, все равно ломается, хорошо что теперь буду знать как исправить некоторые неполадки, опираясь на данные этой статьи.
Очень понравился совет с мощностью блока питания. Старый блок питания работал на всю мощность. После того, как купил себе блок питания более мощный, с запасом 40 % от потребляемой мощности, то светодиодные лампы действительно перестали мигать, а блок питания совсем не греется, а раньше очень горячий был. Думаю, что решать проблему нестабильности работы светодиодных лент надо начинать с блока питания. За контактами также надо смотреть, они намного меньше будут окисляться, если использовать обычную канифоль, а не паяльную кислоту.