A dimmer is a device that controls the brightness of a lamp. Especially popular are such devices in combination with LED lamps. We will learn how dimmers work, what they are, and how to choose them correctly.
- What is a dimmer?
- Why is it needed?
- Device and principle of operation
- Types of dimmers
- By type of installation
- By design
- By way of management
- Advantages and disadvantages
- How to choose a dimmer?
- Installation and connection
- Exploitation
- Top Producers
- Legrand
- Schneider Electric
- ABB
- How to make a dimmer with your own hands?
What is a dimmer?
A dimmer is an electronic device designed to control the power of lamps. Adjustment is carried out by changing the voltage supplied to the load.
Why is it needed?
A dimmer for LED lamps is used wherever you need to adjust the brightness of the lighting. This device allows you to create a comfortable and cozy environment that adapts to the needs and mood of the user. All LED lighting sources are divided into two large groups:
- independent devices – lamps;
- LED strips.
Today, almost any 220 V LED lamp is dimmable. These are lamps with E, MR, G socles. They are screwed into a regular cartridge and the brightness is controlled through the regulator. For LED strips, devices with PWM (pulse width modulation) are used. Examples of using a dimmer:
- decrease in the light flux in the bedroom before going to bed;
- in design interiors where a variety of light patterns is required;
- switching lighting to standby mode – to reduce energy consumption;
- obtaining lighting effects during concerts and other events, including for home celebrations – the lights are dimmed during dances or a romantic dinner.
Highlighting individual zones is currently in trend. The room organizes the backlight, which is regulated using a dimmer and illuminates a certain object or area – for example, a picture or a large vase.
Device and principle of operation
The main element of the dimmer is the key – it is often called a switch or switch. It is controlled by semiconductor transistors, triacs, thyristors. Thanks to dimmers, 220 and 12 V LED lamps operate at 10-100% of their potential.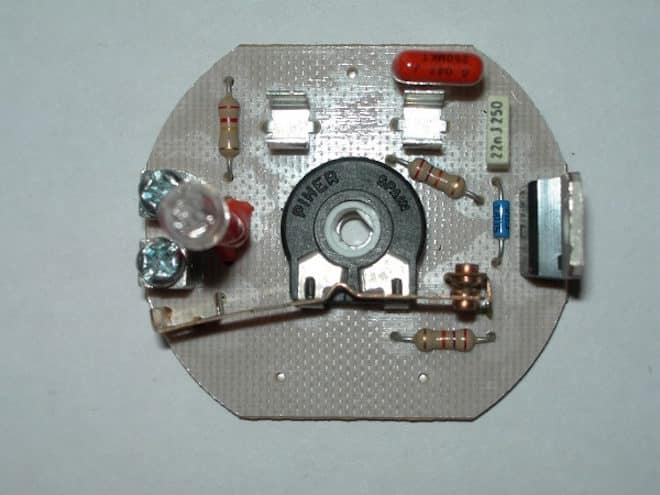
- A sinusoidal alternating current flows through the electrical network. To change the brightness of the LED lamp, a truncated sinusoid is applied to it.
- The sinusoid is cut off by cutting off its part – the leading or trailing edge. Because of this, the voltage supplying the light source decreases. As a result, the power and brightness of the lamp changes.
- Along the front. This method is used to control 220V LED and CFL lamps via electromagnetic transformers. Also, adjustment on the trailing edge of a sinusoid is used in low voltage lamps.
- On the back front. This regulator is used for halogen and LED lamps. Dimming is carried out through electronic transformers.
Dimmers are electromagnetic interference generators. To reduce them, a high-resistance inductor (choke) or an inductive-capacitive filter is included in the circuit. The following video will help you learn more about a typical voltage / brightness regulator circuit:
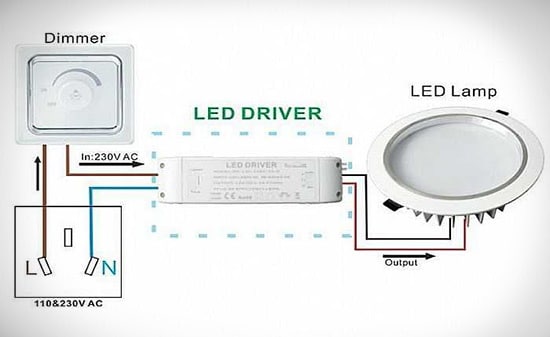
The dimmer is installed with or instead of a switch. The main condition is that the device must be located before the LED lamp driver.
LED-lamp driver – a device for maintaining electric current at a given level. It provides the LEDs with constant current, prevents them from flickering and breaking.
Even a small voltage deviation from the specified parameters leads to flickering and fading of the LEDs – these semiconductor elements are extremely sensitive to power. To ensure that the voltage is supplied within the specified limits, modern circuits do not use the traditional method of load regulation – changing the resistance – but pulse-width modulation. It supplies current to the diodes in short pulses at relatively long intervals. How a PWM dimmer works:
- The circuit is a generator that generates a high-frequency current (200 Hertz).
- A pulse appears at the output, which causes the diodes to glow.
- Inside the LED lamp, a driver is installed that responds to external control. It comes from the regulator. If the current is increased, the driver sends maximum PWM pulses.
The brightness of the LEDs depends on the parameters of the applied pulse, and the brightness of a conventional lamp depends on the current strength. Therefore, the LED dimmer must not be used to control other light emitters.
Types of dimmers
Before buying and installing a dimmer, understand their classification. These devices are widely represented on the market. They differ in design, method of installation and regulation.
By type of installation
All regulators according to the installation method are divided into two large groups:
- Outdoor. They are overhead switches that are mounted directly on the wall. Such devices are usually installed when the interior issue is not a priority.
- Internal. These devices are placed in a pre-prepared niche. The most popular option for residential premises.
By design
Not only the possibilities, parameters, cost, but also the scope of the dimmer depend on the design. Design options:
- Modular. The second name is shield. They are installed in the electrical panel. This is a rather expensive option with complex electronic filling. It is rarely used in everyday life. Install it on mounting rails. There are modular models for LED lamps that not only change the brightness of the glow, but also perform a number of other functions, controlled through digital transmission channels. Devices of this type are used in the Smart Home system.
- Block. A compact device that plugs directly into the lighting circuit. They are used when installing spotlights on stretch ceilings – they mount the device behind the canvas.
- Monoblock . The most primitive option. Such devices are mounted in standard sockets. They are usually placed in apartments.
By way of management
A dimmer is a small device that looks like a normal switch. Switching brightness is carried out in fundamentally different ways. Regulator options:
- Push-button. Simple and easy to manage. The brightness is changed by pressing a button.
- Swivel. Provide for turning the mechanism clockwise or counterclockwise. At the first turn, a click is heard – the lighting turns on, and the lamps light up at 10% of the nominal value.
- Swivel-push. The mechanism rotates similarly to the previous case, but in this way only the brightness is adjusted. To turn on/off the lamps, press the switch.
- Touch. A more modern approach to management. Adjustment is carried out by clicking on the corresponding zones. In expensive models, a color display is provided.
- Remote. The control is carried out wirelessly. The signal is transmitted via radio waves or infrared. In the first case, you can adjust the brightness from any room in the house, in the second case, by pointing the remote control at the regulator.
Advantages and disadvantages
The main advantage of a dimmer is its function – to regulate the brightness of the light. This possibility allows a person to choose for himself the optimal lighting mode – taking into account urgent needs.
- Saving. Dimming allows you to significantly reduce energy consumption by reducing power consumption.
- Zoning. Dividing the room into separate zones with the help of lighting, adjust the brightness of the glow in a particular zone.
- Work at minimum power. When leaving home, you can leave the lights on by setting the lowest brightness of the lamps. Such a move imitates the presence of the owners and scares off thieves.
- Quality. Modern dimmers are reliable, durable and undemanding to working conditions. They endure overloads, work quietly, are compact and weigh little.
- Versatility. The device is used both to control lamps with standard E14 and E27 sockets, and for rarer modifications. Regulators are installed both on single LED lamps and on entire groups of lamps.
Flaws:
- High cost. It takes months, or even years, until the device pays off.
- Risks. There is a possibility of device failure, which can lead to a fire in the circuit. There is also a danger that the regulator will not open the power supply circuit if necessary, which threatens the user with an electric shock.
How to choose a dimmer?
For the dimmer to work correctly, it must be compatible with LED lamps. Therefore, first decide which LED fixtures will be used. Dimmer selection:
- For a 220 V lamp. Phase-pulse devices with a sinusoidal cutoff on the trailing edge are recommended.
- For 12 V. Any PWM controllers or dimmers for LED strips are suitable for low-voltage DC LED lamps.
All modern dimmers for LED lamps work on the PWM principle – linear regulation has long been outdated. It is also recommended to use special lamps designed to work with a dimmer.
How to choose power:
- Sum the load of all LED lights that will be connected via a dimmer.
- Add another 20% to the amount received.
If 2 dimmers are turned on in one circuit, the maximum allowable load is reduced by 25%. Models for 220 V lamps are usually designed for a load of 0.3-1 kW, for low-voltage 12 V lamps – up to 0.1 kW. When buying a voltage regulator, it is important to consider its parameters. It often happens that the dimmer and the LED lamp are incompatible. Any dimmer has a certain voltage threshold, which may not be enough to control a particular lamp. For example, there are LED lamps that can turn on and work at 5% of their power. If you choose the wrong dimmer, it will adjust in the range of 40-100%, which significantly reduces the possibility of dimming.
Installation and connection
There is nothing complicated in connecting a dimmer for LED lamps. All you need is an indicator and a screwdriver. The voltage regulator is connected in series with the switch. But with the installation you have to tinker. If the regulator has an on/off option, it is installed in place of the traditional on/off switch. Installation order:
- Drill the wall with a puncher or a drill with a cylindrical drill. Use diamond or tungsten carbide bits and drill into the wall with the hammerless mode enabled. Toothed crowns – in percussion.
- The depth of the drilled niche is equal to the depth of the socket, the diameter is slightly larger. With a chisel, knock out the material inside the drilled contour and form a blind hole.
- Punch a strobe in the wall with a puncher or chisel. It will connect the junction box and the hole you made.
- Make a groove from the strobe to the lamp. Near the hole, deepen it obliquely to bring it to the back wall of the socket.
- Lay the wiring in the strobes and fill them with mortar.
- In the socket, squeeze out the plug from the side of the wire. Lead the wire sticking out of the wall into the hole.
- Put a little alabaster or cement mortar into the hole and install the socket.
- Remove the insulation from the wires sticking out of the socket, strip the ends of the wires and connect them to the terminals located on the inside of the dimmer.
- Fold the wire like an accordion and place the inside of the dimmer in the socket. Unscrew the screws and spread apart the spacer legs. Screw on the screws.
- Snap the front panel of the dimmer to the socket.
- Connect the wires to the luminaire and check how the regulator functions.
Many experts advise laying wires not in strobes, but in corrugations. If they burn out, you won’t have to hammer the walls.
A video on installing the dimmer is below:
The procedure for connecting a dimmer to 220 V:
- Do not turn off electricity. Use the indicator to determine the phase. Label the wire so you don’t mix it up.
- Turn off the electricity and proceed with the installation.
- The regulator on the case has terminals “L” and “N”. Screw the phase to “L”, zero – to “N”.
- Clamp the wires tightly – create a reliable contact. Use the adjusting screws to level the dimmer body, fix the panel and test the device.
Exploitation
Dimmers are used to adjust special LED lamps – dimmable. Ordinary LED lamps cannot be used in conjunction with a voltage regulator. If you connect a non-dimmable LED lamp to a dimmer, it will only flicker, turn on and off. It is impossible to adjust its brightness, it may burn out. Dimmable lamps are easy to recognize by the appropriate markings on the packaging. There are LED lamps in which there is a quenching capacitor. They can be adjusted, but in a very small range, so they are also not suitable for use with a dimmer. To make sense in purchasing a regulator, use it with dimmable lamps. Opportunities for the operation of dimmers:
- Management from different points. There are dimmers conventional and through. Thanks to the latter, you can control the lamps from different rooms.
- Automatic on-off. Dimmers for chandeliers and other lamps can not only be built into the timer, but also provide for programming. They are also allowed to be connected to smartphones. By programming the glow modes for different times of the day, you can not waste time on adjustment.
- Remote control. It allows you to adjust the brightness of the glow in various ways – by voice or remote control.
- Wi-Fi control. You can change the brightness in your home from anywhere in the world. They do this through a smartphone, tablet, etc.
- Color temperature adjustment. When the brightness changes, the color of the radiation also changes. When dimming, the light from the lamps becomes different. The color temperature varies from 2,700 K to 1,500 K – this is an approximate range.
Top Producers
A dimmer is a high-tech electronic device that cannot be saved on. Cheap Chinese devices are unreliable and can fail at any time. The most popular dimmer manufacturers are located in Western Europe.
Legrand
This oldest French company is considered one of the best among manufacturers of electrical products. The brand is the most recognizable in Russia. Legrand products are sold all over the world.
Schneider Electric
This manufacturer is also owned by the French. The company is famous for high-quality electrical engineering. It has been setting the fashion and standards for electrical goods in Europe for many years. The brand has several factories in the Russian Federation, and its products are in demand all over the world.
ABB
The company represents a joint Swedish-Swiss production and is one of the giants of electrical engineering. The company has been operating on the market for the second century. It introduces advanced technologies and sells its products all over the world. The average cost of ABB dimmers is about 9 thousand rubles.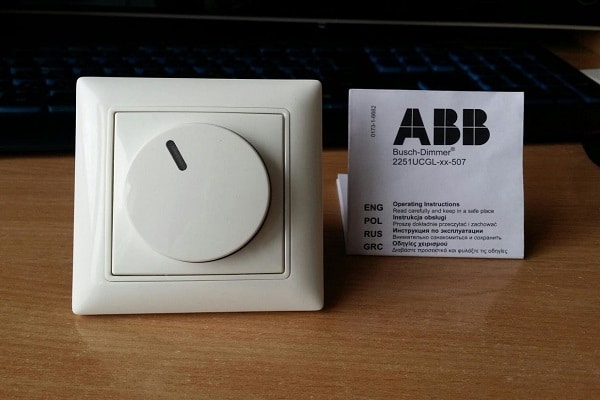
How to make a dimmer with your own hands?
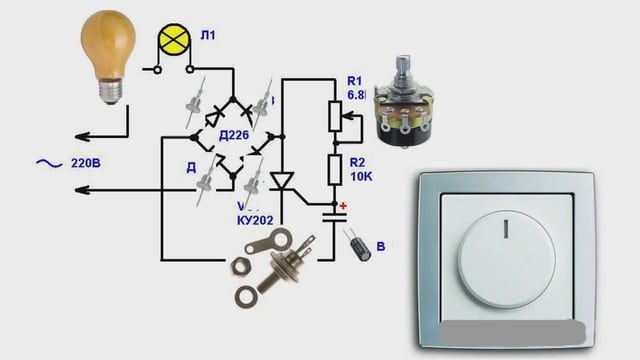
With a soldering iron and minimal skills in working with electronic circuits, you can make a dimmer yourself. For a beginner radio amateur, for example, the following dimmer circuit for 220 V LED lamps is suitable: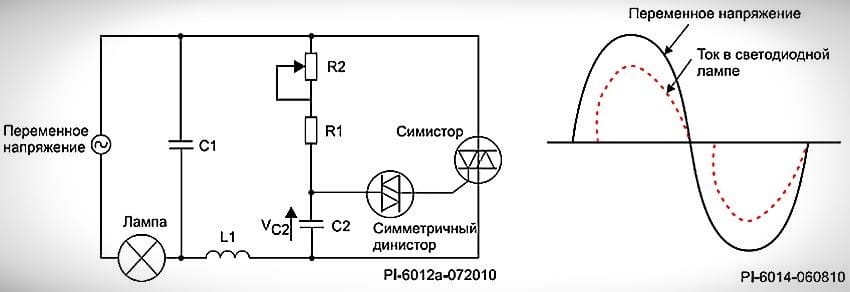
- voltage through an adjustable rheostat is applied to the capacitor;
- C1 gives the accumulated charge to the lamp – it will glow with the appropriate brightness.
How to assemble the circuit:
- Take a textolite board and draw a circuit diagram. It should clearly indicate the location of all parts.
- Drill holes in the board with a thin drill – for the legs of resistors, capacitors and other circuit elements.
- Insert the legs of the radio components into the holes, turn the board over and solder the parts. According to the diagram, connect the legs with copper wire – it replaces the traditional tracks.
- When all the elements are soldered, test the circuit in operation. Take the cartridge with wires and screw the lamp into it. Connect the wiring to the diagram. If the circuit is assembled correctly, the regulator will work after applying voltage.
- Turn the adjustable resistance switch clockwise and counterclockwise. In this case, the brightness of the lamp will change. When the regulator is switched to one of the extreme positions, the lamp will go out.
Controller assembly video:
All twists must be insulated. Do not touch parts during testing – this is dangerous. If your home does not yet have LED lamps and fixtures, and you are just about to install them, consider installing a dimmer. This will allow you not only to dim the light, but also to create various lighting effects when decorating the interior.


Я считаю все светодиоды и светодиодные ленты не обходимы т. к они исключительно долговечны. Конечно их нужно рассматривать каждый по своему. Есть обычный, а есть тот в котором напряжение тока значительно больше. Желательно что бы выбирать помогал опытный человек. Важно знать, что ,белый светодиод имеет наименьший срок службы.Основой LED белого цвета свечения является структура InGaN, излучающая на длине волны 470nm синий цвет – нанесенный сверху на нее люминофор, излучающий в широком диапазоне видимого спектра и имеющий максимум в его желтый части. Человеческий взгляд воспринимает как белый свет. Люминофор ухудшается тепловые характеристики светодиодов, по этому срок службы сокращается
У нас в спальне стоит диммер, это достаточно удобная вещь, например, перед сном делаем более комфортный свет для глаз, приглушая свет ламп. Вообще, светодиодные лампы у нас не основное освещение в комнате, а идет как дизайнерское решение и подсвечивает потолок, но очень удобно его использовать вечером, при этом выключив все другие источники освещения.
Информация, изложенная в статье, как раз актуальна, так как затеяли небольшой ремонт и старый диммер уже не вписывается в интерьер,теперь более подкован в этой теме.
Очень важно чтобы перед подключением LED – освещения был правильно сделан монтаж всех составляющих. Ведь он делается в большинстве случаев раз и навсегда. Поэтому стоит более детально узнать о принципах подключения, выбрать для себя именно тот тип освещения, который будет наиболее эффективным в данном помещении. Продумать каким вы видите окончательный результат, а так же подобрать все детали таким образом чтобы они вписывались в интерьер комнаты. И только после этого закупить все необходимые материалы и преступить к монтажу всех составляющих.
Диммеры для Led-ламп наша семья начала использовать, когда мы готовились к пополнению. Изучив много информации, а так же получив положительные рекомендации от знакомых, решились на установку. Результат превзошел наши ожидания – очень полезная вещь, с помощью которой во-первых мы регулируем свет в детской комнате, что очень удобно и полезно для малыша. Таким образом ребенку проще адаптироваться к режиму дня и ночи. А во-вторых это существенная экономия затрат на электроэнергию, что очень актуально в наше время. Отдали предпочтение фирме Legrand, качеством довольны.
Устанавливали в детской такое устройство. На мой взгляд удобное, в любой момент можно отрегулировать яркость в комнате. Пока работает без нареканий. Думаю устанавливать на кухне , хочу зонировать рабочий стол и обеденную зону, думаю как раз за счёт света это будет сделать оптимально, а диммер нам в этом поможет )
Я бы не советовал заниматься монтажом самостоятельно, если вы не разобрались в теории и не имеете минимальных, базовых знаний в электрике. Можно элементарно ошибиться в расчёте параметров напряжения, совместимости и т.д. Поэтому, – лучше всего обратиться к специалисту или опытному человеку. И, конечно же, если вас интересует долговечность и качество – не стоит в погоне за более дешёвым устройством, отдавать предпочтение китайским производителям, а остановить свой выбор на хорошо зарекомендовавших себя брендах из Западной Европы.
Я бы не советовал заниматься монтажом самостоятельно, если вы не разобрались в теории и не имеете минимальных базовых знаний в электрике. Можно элементарно ошибиться в расчете параметров напряжения, совместимости и т.д. Поэтому, – лучше всего обратиться к специалисту или опытному человеку. И, конечно же, если вас интересует долговечность и качество – не стоит, в погоне за более дешёвым устройством, отдавать предпочтение китайским производителям, а остановить свой выбор на хорошо зарекомендовавших себя брендах из Западной Европы.
Диммеры конечно очень хорошо подходят под любой интерьер. Удобные в использовании и безопасно. Функция управления через Wi-Fi необходимо в наше время и чётко продумано. Светодиодные ленты смотрятся очень аккуратно и освещают комнату на равне как обычные лампы.
Очень удобная и незаменимая вещь при ненормированном напряжении электричества. У нас в пригороде часто к вечеру свет в доме становится очень ярким, так как напряжения больше. Ни раз у нас перегорали лампы. Установили диммеры и вуаля к вечеру регулируем яркость подачи света в комнате как удобно нам. Конечно же это удовольствие обошлось не дешево. Но оно этого стоит! 💡
По этой статье я нашла выход той ситуации. Разновидности диммеров облегчают выбор нужного вида. Классификация идет как по удобности, по качеству и по стоимости.
Диммеры нужны каждой квартиру. Многие не видят в них необходимости. Но на самом деле они просто необходимы для всех. Регулировка яркости света дает нам выбрать нужную яркость в разное время суток. Например нам ночью нужно другое освещение а днем другое. Поэтому когда мы будем встраивать диммер у себя в квартире, мы гарантируем безопасный свет для своего зрение. Светодиоды есть разного вида, поэтому для выбора нам необходимы рекомендации знающих люде. Для этого нам помогут такие информационные сайты где много полезного и информационного.
Прочитал внимательно статью и кое с чем не согласен, в частности с тем, что в статье указаны недостатки диммера это его цена и как написано в статье “дороговизна”. Не согласен! Устанавливал светодиодное освещение в одной из комнат нашего загородного дома и специалист электрик посоветовал этот прибор (диммер) поставит для регулировки освещения, покупал его лично и не заметил, что уж он сильно дорогой. Да, немного дороже простого выключателя, но все равно доступный по цене. И устанавливается он достаточно быстро.
Уже не для кого не секрет, что яркость свечения ламп накаливания и специальных светодиодных можно рекулировать с помощью диммера. Он из себя представляет светорегулятор с поворотным механизмом больше-меньше, в габаритах и посадочном месте обычного выключателя. В задней части располагается закрытая кожухом полупроводниковая схема самого регулятора. Устанавливается стандартно в обычное посадочное место подрозетника.
Подключение довольно простое-сзади есть указатели стрелки вход-выход на винтовых соединениях для проводов. Схема установки стандартная-через фазовый провод.
Однако стоит помнить что в схеме с люминесцентными лампами(энергосберегающими или правильно Компактные люминесцентные лампы ) а так же со светодиодными лампами обычного исполнения данный светорегулятор свои функции выполнять не будет. Даже более-казалось бы выключенные данные лампы а будут промаргивать.
Соответственно нужны хоть не большие но навыки электромонтажа. А так изделие вполне работоспособно и со своими функциями успешно справляется.
Мяу
Ни когда не думал что буду радоваться регулятору освещения!
Первый раз столкнулся с диммером совсем не давно, когда мой ремонт в одних из комнат подходил к концу и оставалось подключить все розетки и выключатели.
Но стоит помнить что в схеме с люминесцентными лампами(энергосберегающими или правильно Компактные люминесцентные лампы ) а так же со светодиодными лампами обычного исполнения данный светорегулятор свои функции выполнять не будет. Даже более-казалось бы выключенные данные лампы а будут промаргивать. Соответственно нужны хоть не большие но навыки электромонтажа. А так изделие вполне работоспособно и со своими функциями успешно справляется.
Никогда не думал что буду радоваться регулятору освещения! Первый раз столкнулся с диммером совсем не давно, когда мой ремонт в одних из комнат подходил к концу и оставалось подключить все розетки и выключатели. Но стоит помнить что в схеме с люминесцентными лампами(энергосберегающими или правильно Компактные люминесцентные лампы ) а так же со светодиодными лампами обычного исполнения данный светорегулятор свои функции выполнять не будет. Даже более-казалось бы выключенные данные лампы а будут промаргивать. Соответственно нужны хоть не большие но навыки электромонтажа. А так изделие вполне работоспособно и со своими функциями успешно справляется.
Я никогда не думал что буду радоваться регулятору освещения! Первый раз столкнулся с диммером совсем не давно, когда мой ремонт в одних из комнат подходил к концу и оставалось подключить все розетки и выключатели. Но стоит помнить что в схеме с люминесцентными лампами(энергосберегающими или правильно Компактные люминесцентные лампы ) а так же со светодиодными лампами обычного исполнения данный светорегулятор свои функции выполнять не будет. Даже более-казалось бы выключенные данные лампы а будут промаргивать. Соответственно нужны хоть не большие но навыки электромонтажа. А так изделие вполне работоспособно и со своими функциями успешно справляется.